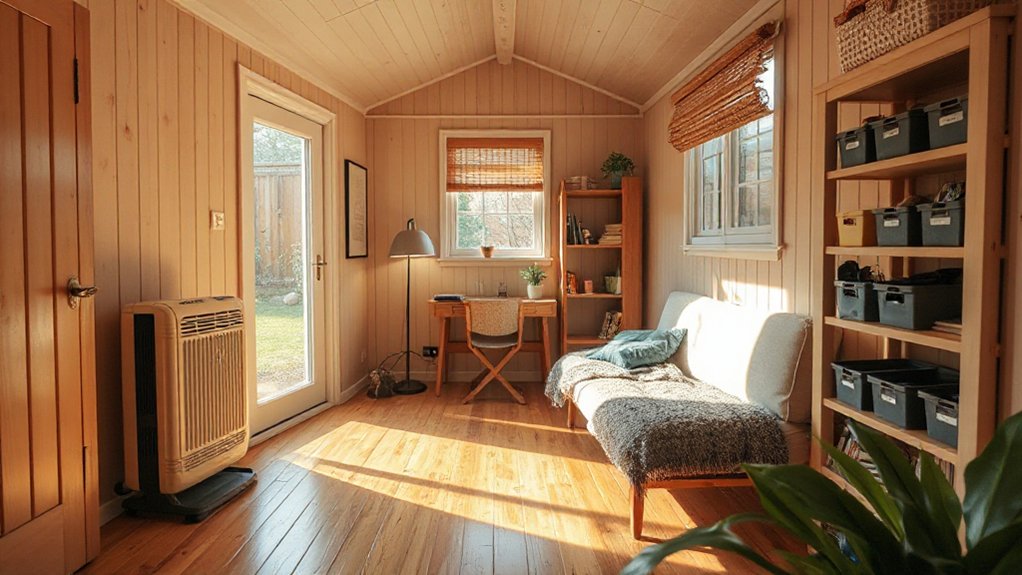
Turning a garden shed into a usable room starts with a precise assessment of structure, permits, and insulation so you know the constraints before you invest. You’ll need an aligned layout, climate control, and code-compliant electrical work to guarantee safety and comfort. Don’t overlook drainage, ventilation, and finishes that weather endure. With the right plan, you’ll gain a functional, durable extension, yet the key decisions that follow will determine how smoothly the project progresses and what lasting value you achieve.
Key Takeaways
- Assess zoning, permits, and structural readiness early to convert a shed into habitable space legally and safely.
- Plan layout with defined zones, adequate access, and 32-inch walkways to optimize function and flow.
- Insulate well, seal air leaks, and manage moisture to prevent mold and drafts for year-round comfort.
- Install electrical with safe wiring, GFCI protection, and appropriate lighting for multi-use needs.
- Focus on finishes and outdoor integration that match the home’s style while prioritizing durability and low maintenance.
Is a Shed Right for Your Extra Space?
A shed can be a practical addition if you’re seeking extra space without committing to a full-scale extension. You evaluate fit by evaluating footprint, insulation, and access. Confirm that the structure supports conversion without compromising structural integrity.
Consider glazing, ventilation, and moisture control to prevent mold and heat buildup. You’ll want durable, low-maintenance finishes that resist weathering and simplify upkeep.
Plan for electrical supply, lighting, and climate regulation to sustain multiple uses. Determine how garden plantings and outdoor furniture can harmonize with the space—non-structural elements shouldn’t hinder circulation or safety.
Check eave height, door clearance, and built-in storage potential to optimize layout efficiency. Budget for professional input on permits and code compliance if required, even when the shed appears straightforward.
Prioritize a purpose-driven design to guarantee long-term reliability.
Check Zoning and Permits Early
Check your local zoning rules now to determine if converting a shed is allowed and what setbacks apply.
Secure permits early to outline required inspections, utilities, and code compliance. This upfront check minimizes changes later and keeps your project on schedule.
Check Local Zoning
To avoid delays and fines, verify local zoning requirements and permit needs before you start any structural work. You’ll assess setbacks, lot coverage, and use classifications that affect interior renovations, utility hookups, and accessory structures.
Confirm whether a shed conversion qualifies as habitable space and if changes trigger zoning variances or design review. After confirmation, document clear criteria for approved layouts, stormwater handling, and insulation standards.
Ensure compliance with fire and egress rules, and coordinate with utility providers for service upgrades. Garden decor and plant maintenance considerations remain peripheral to zoning, but plan storage and ventilation accordingly to avoid code violations.
- Confirm zoning district and permitted use for habitable space
- Check setback, height, and lot coverage limits
- Verify required inspections and permit types
- Align future maintenance access with code provisions
Secure Permits Early
Check zoning rules for setbacks, accessory-use claims, and any HOA restrictions that could affect layout.
Gather documentation: site plan, structural notes, and electrical diagrams, then submit for review promptly.
Align your timeline with permit processing to avoid rework from code updates.
As you plan, consider shed aesthetics and garden furniture placements within approved dimensions to maintain compliance while meeting function.
Keep track of permit conditions and inspection dates, scheduling sequential inspections to prevent backtracking.
Maintain clear, concise records of approvals, amendments, and communications to ensure a smooth construction phase.
Choose a Shed for a Room Conversion
Choosing the right shed for a room conversion hinges on structural integrity, dimensions, and access. You must evaluate framing, foundation, walls, and roof load to guarantee long‑term performance.
Measure interior space precisely to confirm usable area and window placements. Confirm door width and traffic flow align with planned equipment, utilities, and egress requirements.
Verify the shed’s weather sealing, insulation potential, and compatibility with retrofit options. Consider site orientation to maximize daylight while minimizing heat gain.
Budget for contingencies in materials and labor. Planning thoughtfully now reduces revision costs later.
Include garden decor and plant organization considerations in your overall design to maintain aesthetics without compromising function.
Prioritize sheds with adjustable wall plates, shim-friendly foundations, and easy access for retrofit tasks.
- Structural assessment checklist
- Insulation and seal readiness
- Door and window feasibility
- Access and utility potential
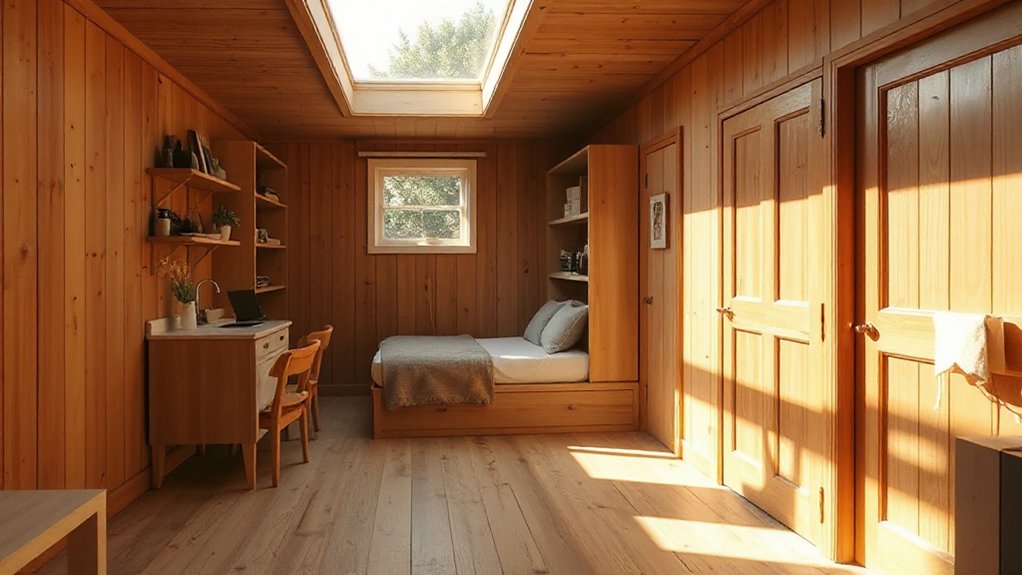
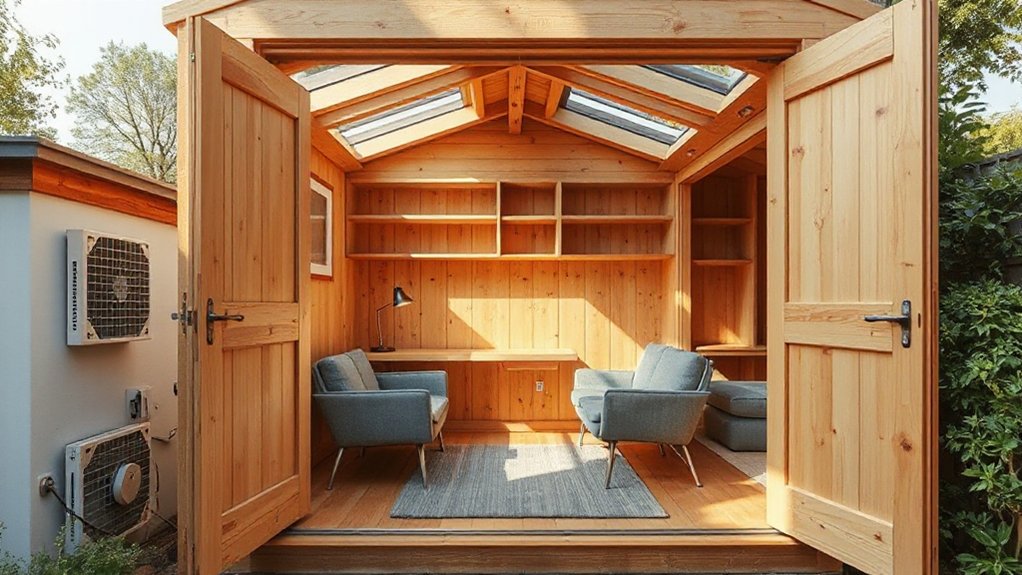
Plan a Layout That Maximizes Usable Space
Plan a layout that prioritizes circulation, functional zones, and flexibility from the start. You should map entry points, door swings, and primary sightlines to minimize interference with activities.
Establish distinct zones: a workbench area, a compact seating nook, and storage to reduce clutter.
Use a grid or proportion-based approach to align furniture with wall boundaries, avoiding chase gaps that waste space.
Prioritize clear walking paths of at least 32 inches, and consider vertical storage to free floor area.
Select modular furniture that can reconfigure for different tasks, maximizing adaptability.
Integrate garden decor as visual anchors without crowding circulation.
When selecting outdoor furniture, choose compact, weather-resistant pieces that tuck neatly when not in use, preserving openness and flow.
Plan for scalable additions without compromising available space.
Insulation Strategies for Year-Round Comfort
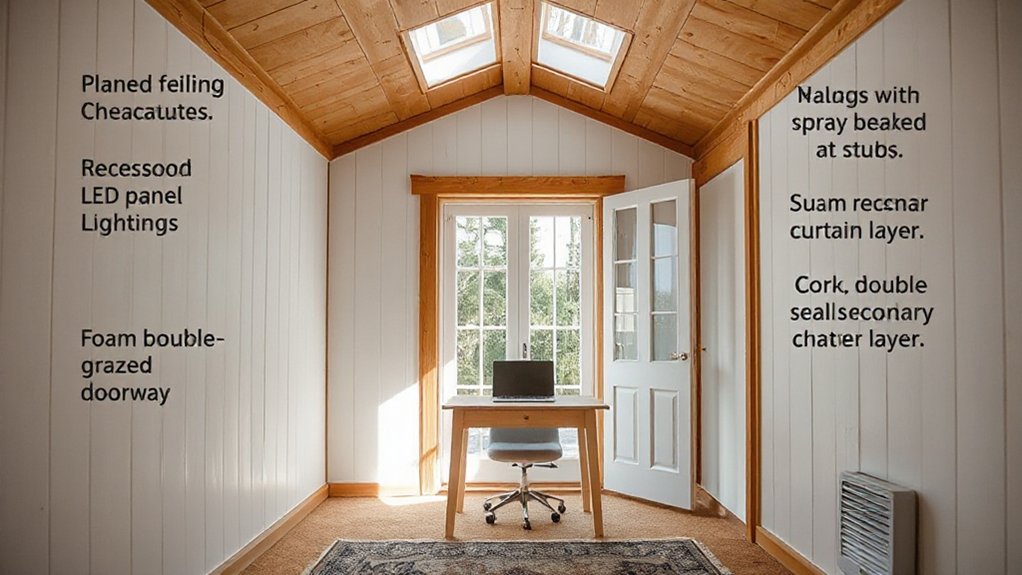
You choose the insulation material that matches your climate, prioritizing R-value, moisture resistance, and ease of installation.
Use air sealing techniques to minimize drafts and maximize thermal performance, focusing on joints, penetrations, and seams around the shed envelope.
This discussion centers on selecting appropriate materials and sealing methods to maintain comfort year-round while controlling energy use.
Insulation Material Choices
Insulation material selection hinges on achieving effective thermal resistance, moisture management, and ease of installation within a shed conversion. You should weigh R-values, vapor diffusion, and compatibility with framing.
Choose materials that minimize air gaps while sustaining structural integrity under year-round use. Assess fire ratings, mold resistance, and environmental impact to sustain longevity in garden decor contexts and practical planting tips.
- Fiberglass batt or mineral wool for cost-effective bulk insulation with easy retrofit
- Rigid foam boards for high thermal resistance in limited wall thickness
- Sprayed polyurethane or cellulose for continuous coverage and minimal joints
- Reflective foil or radiant barriers to reduce cooling loads in sunny climates
Prioritize installation accuracy, edge sealing, and moisture barriers to ensure stable comfort and reliable performance.
Air Sealing Techniques
Air sealing is the practical complement to chosen insulation, locking in the performance you’ve planned for year-round comfort. You’ll address gaps with a systematic approach, starting at penetrations around doors, windows, and utility runs.
Use low-expansion spray foam for larger gaps, and high-quality backer rod and caulk for joints that move with framing. Seal the attic or shed roof underside to curb warm-up losses, then tighten crawl spaces or basements, where infiltration commonly occurs.
Verify continuous envelopes with a blower door or smoke test, targeting minimal leakage. Pay attention to color schemes and furniture placement; guarantee vents, outlets, and trim don’t create bypass routes.
Record sealant types, thicknesses, and locations for future maintenance, and recheck after seasonal changes.
Electrical Safety and a Solid Lighting Plan
To guarantee safe operation and dependable illumination, start with a thorough electrical plan that matches your shed’s intended use and local code requirements. You’ll confirm electrical wiring routes are protected, circuits are sized for expected loads, and GFCI protection is in place for outdoor access.
Establish a dedicated lighting plan with labeled zones, using appropriate fixtures and switches to minimize glare and shadows. Verify junction boxes are accessible and enclosures meet IP ratings for the shed environment.
Document cord routes to avoid traction or abrasion risks, and install arc-fault protection where required. Maintain a clear separation between electrical and humidity-prone areas, and test the system after installation to confirm reliable lighting placement and safety.
- Electrical wiring routing and protection
- GFCI and circuit sizing compliance
- Lighting placement zoning and control
- Safe cord management and testing procedures
Ventilation and Moisture Control for a Healthy Shed Room
Good ventilation and moisture control are essential to prevent mold, condensation, and dampness that can degrade structure and occupant comfort in a shed-turned-room. You must design a balanced system that minimizes latent moisture buildup while preserving thermal comfort.
Prioritize natural ventilation where feasible, using operable windows and vents positioned to maximize cross-ventilation without creating drafts.
Pair this with controlled mechanical ventilation to ensure a constancy of air exchange, especially in sealed seasons.
Implement humidity control measures with sensors and dehumidification as needed, maintaining interior RH within 40–60% for occupant comfort and material longevity.
Prevent moisture intrusion via weatherproofing, sealants, and flashing at all joins.
Regularly inspect seals, ventilation paths, and vapor barriers to sustain performance.
Finishes to Match Your Home Style
To harmonize your shed with the main house, start by selecting exterior finishes that visually align in color, texture, and scale.
Maintain interior tone consistency by choosing a cohesive palette and materials that carry through from exterior to interior spaces.
Prioritize high-quality materials that match your home’s style, ensuring consistent detailing and durability across all surfaces.
Matching Exterior Finishes
- Coordinate color palettes across siding, trim, and roofing
- Choose durable finishes suited to your climate
- Match texture and scale to the home’s details
- Plan garden decor and outdoor furniture to complement the scheme
Interior Tone Consistency
Select flooring with neutral undertones and a scale that complements existing trim, then carry the same palette across walls and ceilings to maintain lineage. Use hardware and cabinetry profiles that mirror your house, ensuring consistent edge details and finish sheen.
Integrate Garden decor with restrained contrast to avoid visual fragmentation, and plan plant-friendly zones that reinforce a unified aesthetic. Account for plant maintenance near light fixtures and damp areas, preserving tone harmony while sustaining usability and longevity.
Material Quality Selection
Material quality must align with your home’s standard of finishes and performance expectations. You’ll select materials that resist wear, moisture, and temperature shifts while preserving aesthetic cohesion with existing spaces. Prioritize durability, dimensional stability, and low maintenance for long-term shed storage and daily use.
Match fastener types and coatings to typical interior humidity and outdoor exposure. For finishes, favor low-VOC options and breathable substrates to minimize odor and improve air quality in garden decor displays. Consider seamless progressions between indoor and outdoor areas to maintain visual flow.
Guarantee color, texture, and sheen reflect your home style without sacrificing function.
- Durable, water-resistant finishes for walls and ceilings
- Low-VOC paints and sealants aligned with home palette
- Weather-tested flooring with slip resistance
- Integrated shelving and concealed hardware for shed storage efficiency
Quick-Budget Upgrades to Boost Comfort
Even on a tight budget, you can enhance comfort quickly by targeting practical upgrades that don’t require major construction. You’ll focus on insulation, lighting, and climate control to reduce drafts, glare, and heat loss.
Install weatherstripping on doors, add a thin insulated panel beneath the sash, and seal gaps around windows to your defined acceptable tolerances.
Choose energy-efficient LED lighting and task lighting that minimizes shadows and shadows’ impact on perceived space.
For comfort, implement a programmable thermostat or space heater with safety controls, and pair it with a quiet ceiling fan to improve air circulation.
Decor matters, but stay purposeful: use garden decor as accents and optimize outdoor furniture placement to create a welcoming shift from garden to interior.
Prioritize durable, maintenance-friendly items to sustain long-term comfort.
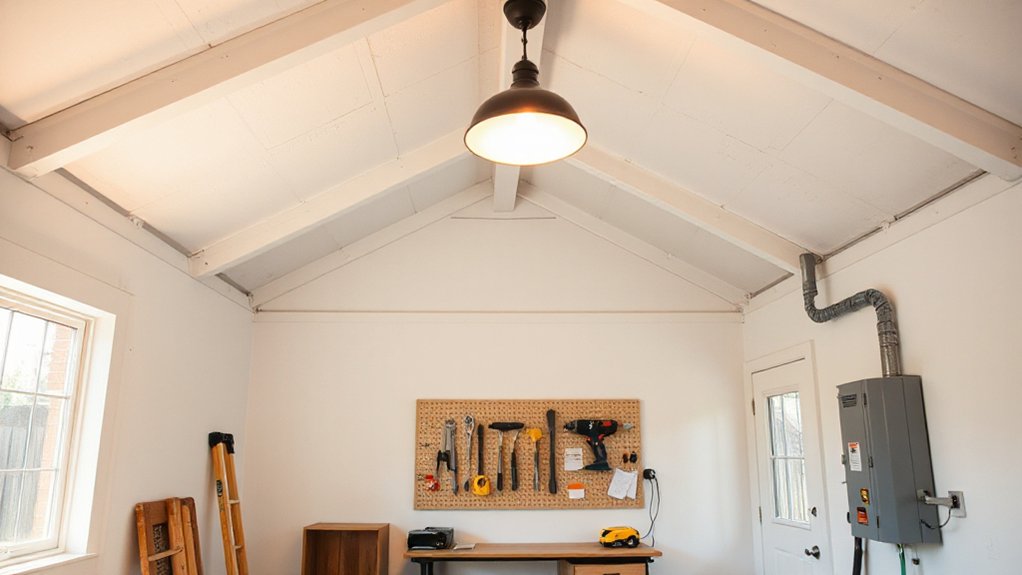
Hire Wisely: Permits, Codes, and Professional Help
Guiding permits, codes, and professional help is essential to a safe, compliant shed-to-room conversion. You’ll secure structural integrity, avoid violations, and align with local inspections from project start to finish.
Begin with foundation planning to support loads, maintain grade, and prevent settlement. Then coordinate drainage solutions to avert water intrusion and mold risk.
Engage licensed professionals for electrical, plumbing, and HVAC scopes to meet code, expand utility capacity, and obtain stamped plans.
Document permit milestones, inspections, and changes to prevent rework.
Select contractors based on references, licenses, and warranty terms to guarantee long-term performance.
- Foundation planning: verify soil type, frost depth, and load paths
- Drainage solutions: slope, perimeter drainage, and backwater protection
- Code-compliant systems: electrical, plumbing, and fire safety
- Documentation: permits, plans, and inspection records
Maintain, Protect, and Future-Proof Your Shed Room
A well-maintained shed room requires proactive protection and strategic planning to guarantee longevity and reliability. You install a durable roof assembly with proper flashing and venting to prevent moisture ingress, then seal gaps to minimize air leakage.
Prioritize garden maintenance by trimming surrounding vegetation away from walls, ensuring drainage slopes away from foundations, and clearing debris that could harbor pests.
Implement a weather-resilient exterior finish and gutters that channel water effectively, reducing splash exposure to substrates. For shed protection, apply a perimeter moisture barrier, verify door seals, and keep HVAC or electrical components rated for outdoor use dry and accessible.
Schedule routine inspections, address rust or rot immediately, and update insulation as needed.
Future-proof through modular shelves, adaptable electrical layouts, and scalable climate controls to accommodate evolving needs.
Frequently Asked Questions
How Much Does Shed-To-Room Conversion Typically Cost?
A typical shed-to-room conversion costs between $5,000 and $20,000, depending on size, insulation, electrical work, and finishes.
You’ll likely face Landscaping costs if you’re regrading or adding drainage, and you must budget for permit requirements to meet local codes.
You’ll need to evaluate foundation stability, moisture barriers, and ventilation.
You should obtain multiple quotes, verify permits, and plan for HVAC, windows, and flooring, ensuring structural integrity and compliance throughout the project.
Can a Shed Be Wired for a Full Kitchen?
Yes, a shed can be wired for a full kitchen, but you must plan extensively.
Guarantee electrical wiring complies with local codes, with dedicated circuits for appliances, GFCIs, and proper protection.
You’ll need plumbing installation considered for a kitchen sink, venting, and drainage.
Obtain permits, run weatherproof conduit, and upgrade the main panel if required.
Hire a licensed electrician and plumber to avoid hazards and ensure safe, compliant operation.
Do Sheds Require a Separate HVAC System?
Sure—no, sheds don’t require a separate HVAC system if you install proper space conditioning within the structure. You’ll assess insulation requirements and sealing first, then size a unit accordingly.
Insulation requirements should meet local code, and consider radiant barriers for heat gain.
Permitting considerations vary by jurisdiction, so check with authorities before installation.
You’ll also guarantee combustion safety if you add appliances.
Anachronism: you still must “tinker” with the old plans like a wizard in a castle.
What Are the Best Foundations for a Shed Room?
The best foundations for a shed room are concrete slab, concrete pier, or engineered timber frame on compacted gravel. Foundation types depend on load, frost line, and site drainage.
Guarantee level, square framing, and moisture barriers; address structural considerations like load distribution, frost protection, and anchoring.
Use proper footings, vapor barrier, and insulation. Verify core tolerances for doors and windows, then install a stable, durable base that resists settling and maintains thermal efficiency.
How Long Does the Conversion Process Take?
The conversion typically takes about 4 to 8 weeks, depending on scope, permits, and contractor availability. You’ll schedule inspections for electrical, insulation, and plumbing, then complete framing, fit-out, and finishes.
Plan for weather delays and material lead times. Garden decor influences lighting choices and ambiance, while shed maintenance schedules affect accessibility during work.
You should align milestones with your budget, ensuring you have temporary space for utilities and clear access. Expect pushbacks but maintain steady progress toward completion.
Conclusion
You, brave homeowner, have engineered a shed into a usable room—concrete plan, airtight seals, and a thermostat that behaves. Picture it: a climate-controlled oasis amid the compost bin and garden gnomes, code-compliant, electrified with confidence, and future-proofed for inevitable hobby upgrades. Sure, the permit maze was gnarly, but now you approve blueprints with the precision of a surgeon. In short, your shed isn’t a shed; it’s a compliant, cozy extension—spam-free, stress-free, remarkably habitable.